")
You’ve probably seen it before on a chart—a smooth, rounded U-shape followed by a small, downward dip. At first glance, it doesn’t look like much. Maybe you even skipped past it, thinking, “Hmm… interesting, but not sure what to do with that.”
Table Of Content
- Why This Pattern Speaks Volumes
- What is the Cup and Handle Pattern?
- Where Does It Appear?
- Why Traders Love This Pattern
- Key Components of a Valid Cup and Handle
- 1. The Cup (The “U” Shaped Base)
- 2. The Handle (The Final Pullback)
- 3. The Breakout (Confirmation Signal)
- How to Trade the Cup and Handle Pattern
- Step 1: Entry Point
- Step 2: Stop-Loss Placement
- Step 3: Profit Target
- Common Mistakes to Avoid
- Real-World Example: Tesla (TSLA) 2020 Breakout
- Exhibits
- Final Thoughts
- Frequently Asked Questions
- 1. How reliable is the Cup and Handle pattern?
- 2. What timeframe works best for this pattern?
- 3. Can the Cup and Handle fail?
- 4. Should I buy the breakout or wait for a pullback?
- 5. How do I measure the profit target?
- 6. Can this pattern appear in downtrends?
- 7. What’s the difference between Cup and Handle and Double Bottom?
- 8. Do I need volume confirmation?
That’s no coincidence. What you spotted was the Cup and Handle pattern—one of the most quietly powerful bullish setups in technical analysis. It doesn’t scream for attention like a breakout candle or a head-and-shoulders top, but when it forms correctly, it often signals a high-probability move to the upside.
The key is knowing how to recognise it early, validate it properly, and trade it with confidence.
This is the story of the Cup and Handle pattern, one of the most reliable formations in trading. And if you learn to read it properly, it might just change your trading too.

The Cup and Handle pattern is one of the most reliable bullish continuation patterns in trading. First introduced by William O’Neil in his classic book “How to Make Money in Stocks,” this pattern has stood the test of time, helping traders spot high-probability breakout opportunities.
In this guide, we’ll break down:
✅ Why This Pattern Speaks Volumes
✅ What is the Cup and Handle pattern (with real chart examples)
✅ Key components (cup, handle, breakout rules)
✅ How to trade it effectively (entry, stop-loss, profit target)
✅ Common mistakes to avoid (false breakouts, V-shaped cups)
Whether you’re a beginner or an intermediate trader, this guide will help you confidently identify and trade this powerful pattern.
Why This Pattern Speaks Volumes
Markets have a language. The Cup and Handle is one of its most eloquent phrases.
Imagine a stock that’s been rising steadily. Then, it starts to dip—not sharply, but slowly, as if testing the waters. Buyers step in, lifting it back up, forming a smooth curve. Then, just before the next big move, it hesitates one last time—the handle—as if gathering strength.
This isn’t random. It’s the market telling you:
- “The sellers are exhausted.” (The cup)
- “The weak hands are gone.” (The handle)
- “Now, we go higher.” (The breakout)
It’s a story of supply and demand, played out in candlesticks. And once you see it, you can’t unsee it.
What is the Cup and Handle Pattern?
The Cup and Handle is a bullish continuation pattern that indicates a temporary pause in an uptrend, like the market catching its breath, before potentially pushing higher again.
It’s named for its distinctive shape on the chart: the price action forms a smooth, rounded “cup,” followed by a smaller pullback that resembles a “handle.”
Think of it like a runner in a race—the cup is the part where they slow down to conserve energy and gather momentum, and the handle is a quick final adjustment before they sprint toward the finish line.
- The Cup – A gradual “U”-shaped decline and recovery (like a rounding bottom).
- The Handle – A small pullback (flag or pennant) before the breakout.
Think of a saucer, not a cliff. The decline should be gradual, the recovery steady. The longer it takes, the stronger the signal. A cup that forms over months is far more reliable than one that appears in days.
Where Does It Appear?
- Mostly seen in uptrends (continuation pattern).
- Can also form in downtrends or sideways markets (reversal signal).
Why Traders Love This Pattern
- Provides a clear entry, stop-loss, and profit target.
- Works across stocks, forex, and crypto (e.g., Bitcoin, Tesla, Amazon).
Key Components of a Valid Cup and Handle

For the pattern to be reliable, it must have these three parts:
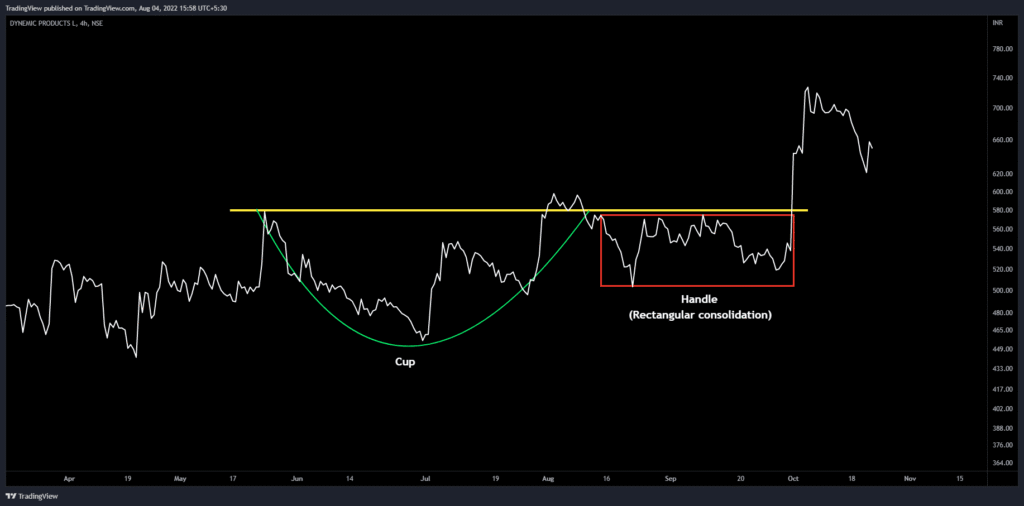
1. The Cup (The “U” Shaped Base)
- Should look like a smooth “U” (not a sharp “V”).
- Depth: Ideally 30-50% retracement from the prior high.
- Duration: Weeks to months (longer cups = stronger breakout).
❌ Avoid:
- V-shaped cups (weak consolidation).
- Too deep retracements (beyond 60-70%).
📌 Pro Tip: The cup’s right side should take a similar amount of time as the left side (symmetry matters).
2. The Handle (The Final Pullback)
- A small downward drift or sideways move (retesting support).
- Retracement: Ideally 10-30% of the cup’s height.
- Duration: Shorter than the cup (days to weeks).
❌ Avoid:
- Deep handles (retracing more than 50%).
- Extended consolidation (weak momentum).

📌 Pro Tip: A tight flag or pennant as the handle often leads to stronger breakouts.
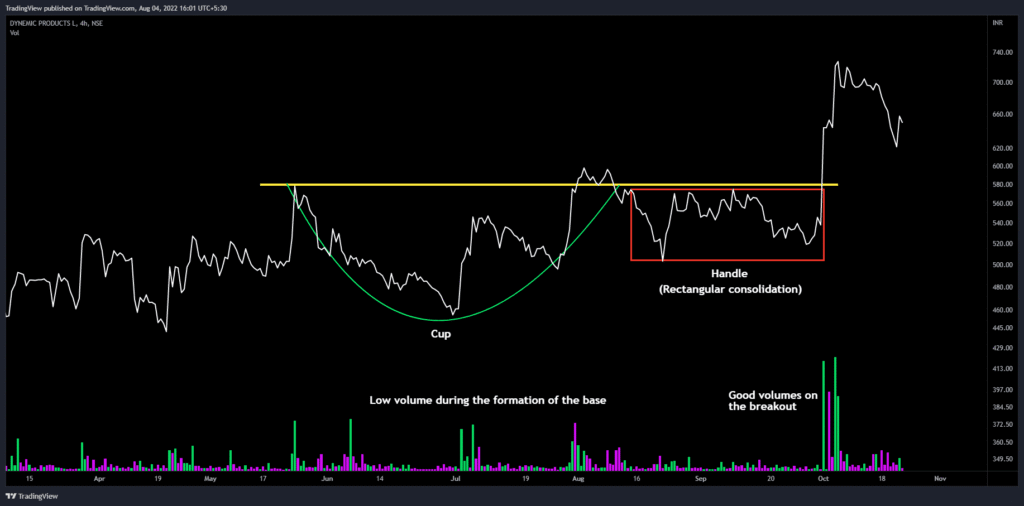
3. The Breakout (Confirmation Signal)
- Price breaks above the neckline (resistance level).
- Volume spikes on breakout (confirms buying interest).
- Pullback to neckline (common before the next rally).
❌ False Breakout Warning: If price falls back below the neckline quickly, the pattern may fail.
How to Trade the Cup and Handle Pattern
Step 1: Entry Point
- Buy when the price breaks above the neckline (which acts as a resistance level) with rising volume.
- Optional: Wait for a pullback to the neckline for a better risk-reward entry.
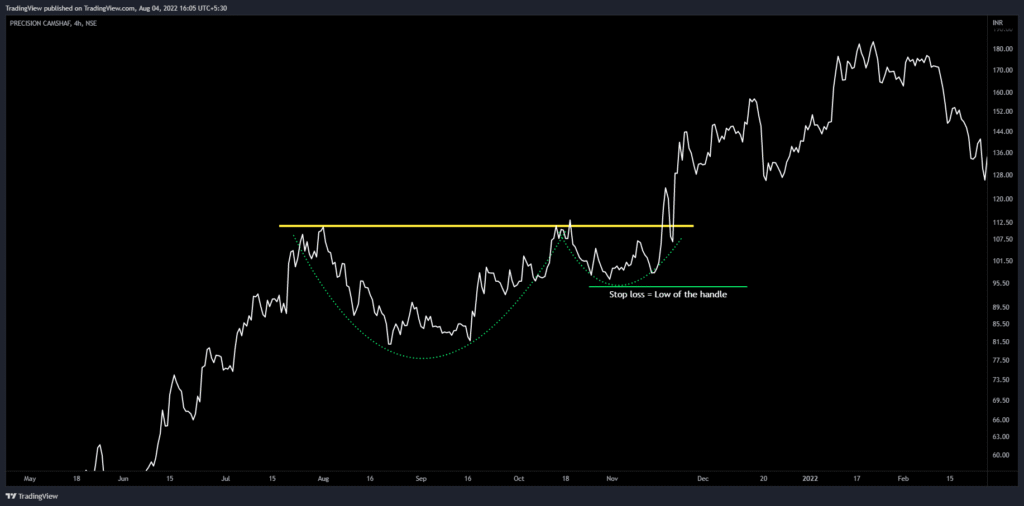
Step 2: Stop-Loss Placement
- Below the handle’s low (logical support level).
- If the handle is choppy, place it below the recent swing low.
Step 3: Profit Target
- Measure the cup’s depth (from low to neckline).
- Project the same distance upward from the breakout point.
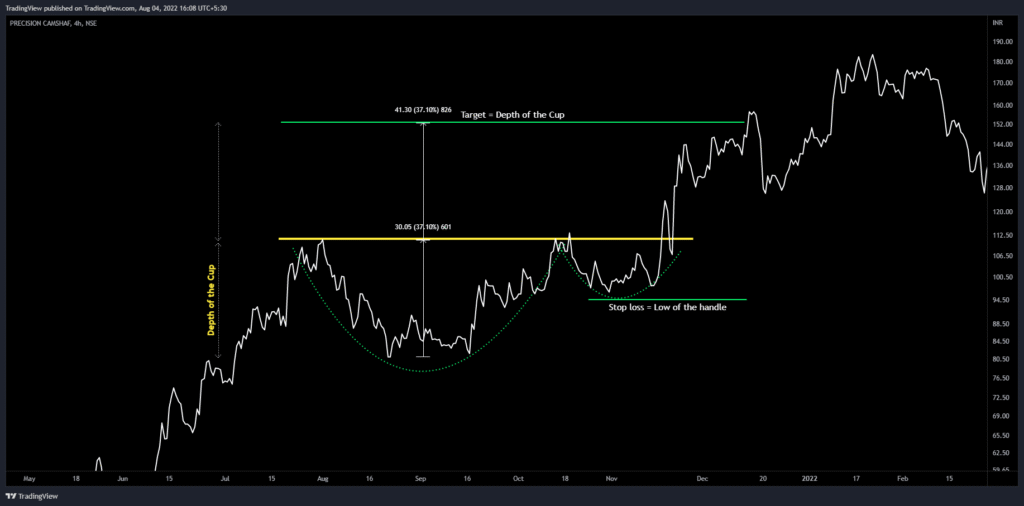
Example:
- Cup low = $100
- Neckline = $150 (cup depth = $50)
- Breakout at $150 → Target = $200 ($150 + $50)
Common Mistakes to Avoid
🚫 Trading V-shaped cups (weak support, prone to failure).
🚫 Ignoring volume (breakouts without volume often fail).
🚫 Placing stops too tight (gets shaken out by normal retracements).
🚫 Forcing the pattern (not every U-shape is a Cup and Handle).
Real-World Example: Tesla (TSLA) 2020 Breakout
- Cup Formation: March-June 2020 (post-COVID crash recovery).
- Handle: Small pullback in late June.
- Breakout: Early July with strong volume.
- Result: Stock surged over 300% in months.
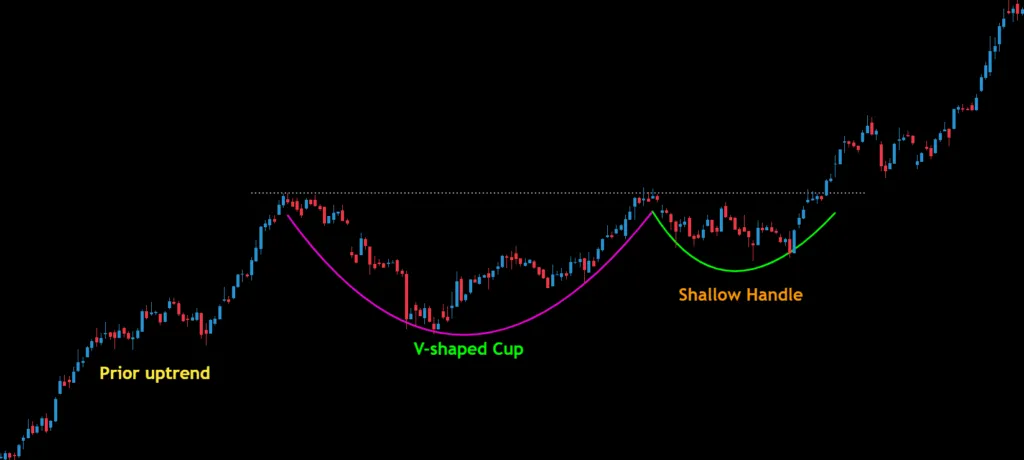
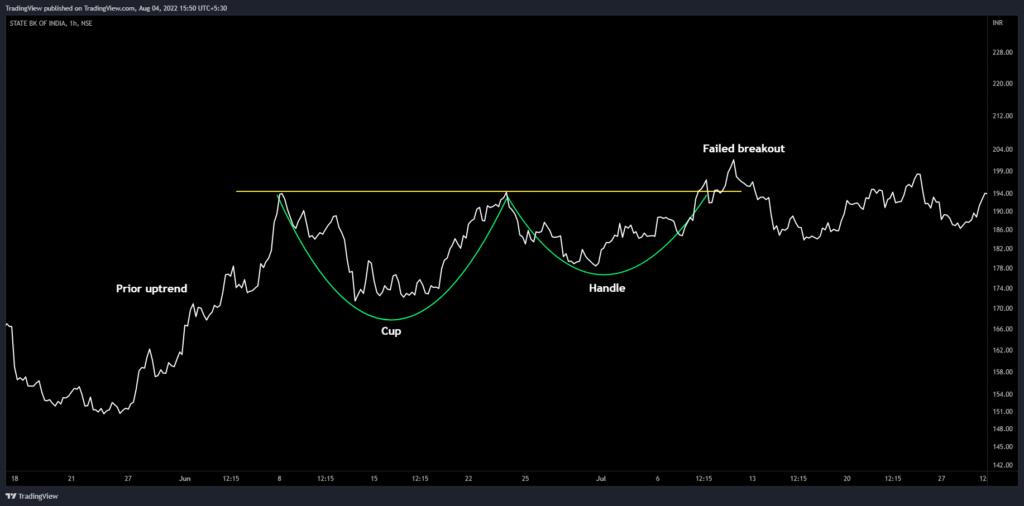
Exhibits
A Cup and Handle pattern with a shallow handle in the shape of a parallel channel

A Successful Cup and Handle pattern with a V-shaped cup and a shallow handle
Cup and Handle pattern with a failed breakout
Final Thoughts
The Cup and Handle pattern is a powerful tool, but not every one works. Always:
✔ Check volume on breakout.
✔ Wait for confirmation (don’t preemptively buy).
✔ Manage risk with a stop-loss.
Frequently Asked Questions
1. How reliable is the Cup and Handle pattern?
The pattern is highly reliable when all criteria are met (proper U-shape, shallow handle, volume confirmation). However, no pattern works 100% of the time—always use a stop-loss.
2. What timeframe works best for this pattern?
Stocks: Daily or weekly charts (longer timeframes = stronger signals).
Crypto/Forex: 4-hour or daily charts work well.
3. Can the Cup and Handle fail?
Yes, especially if:
– The breakout lacks volume.
– The market is in a strong downtrend.
– The handle is too deep (retraces more than 50%).
4. Should I buy the breakout or wait for a pullback?
Aggressive traders: Enter at breakout.
Conservative traders: Wait for a pullback to the neckline for better risk/reward.
5. How do I measure the profit target?
Measure the cup’s depth (from low to neckline).
Add that distance to the breakout point.
6. Can this pattern appear in downtrends?
Yes! If it forms after a long downtrend, it may signal a bullish reversal instead of a continuation.
7. What’s the difference between Cup and Handle and Double Bottom?
Cup and Handle: Single U-shaped base + small handle.
Double Bottom: Two distinct lows (W-shape) without a handle.
8. Do I need volume confirmation?
Yes! Volume should:
– Decline during cup/handle formation.
– Surge on the breakout.
Found this guide helpful? Feel free to bookmark it, share it with fellow traders, and follow along for more straightforward, experience-based insights. I’m simply here to share what I’ve learned along the way — no hype, just honest trading lessons.
")


